🗺️ Table map
The table map shows occupancy for a single day — which table is free, which is booked and who is sitting there. It's the fastest way to check availability while someone is on the phone.
You'll find it under Reservations → Views → Table map.
It is written with restaurant vocabulary. In your admin panel a table is named after your business type — chair, station, room, room type or space. The steps are identical either way; the translation table lives in Pick your business type.
Floor plan and list
Top right you switch between two views of the same data:
- Floor plan — the tables drawn where they actually stand in your venue.
- List — cards grouped by zone, with the full reservation text.
The choice is remembered in your browser, so everyone opens the view they work with.
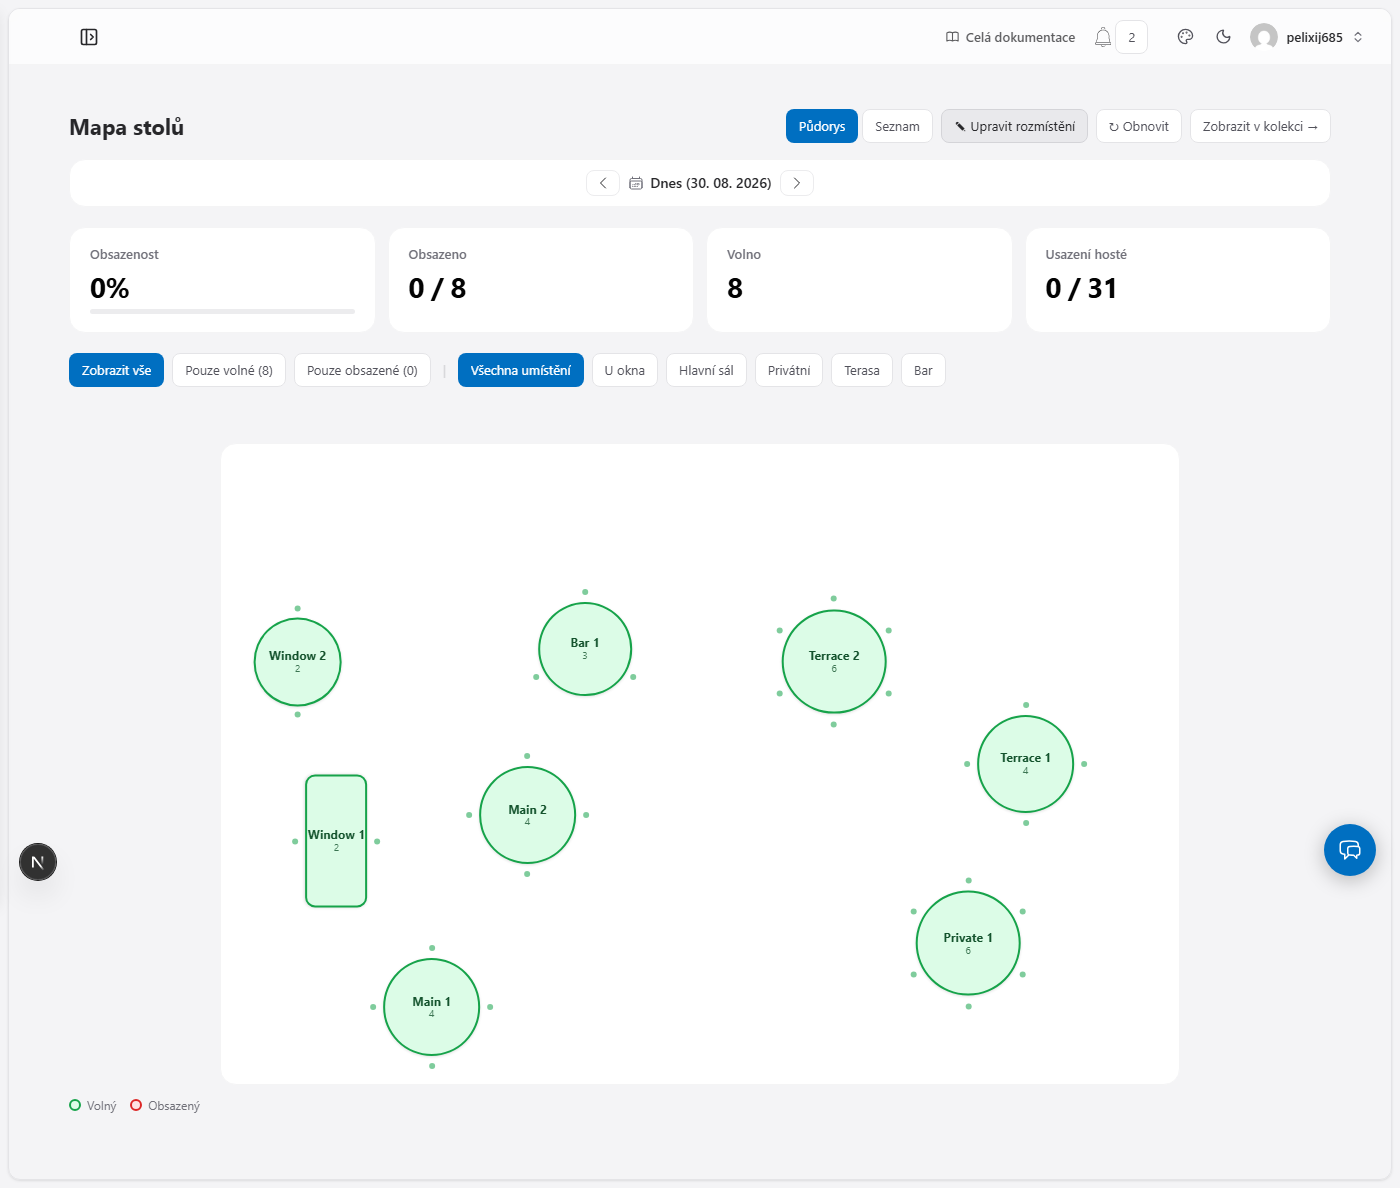
At the top are the totals for the selected day:
| Figure | Meaning |
|---|---|
| Occupancy | Percentage of the bookable units taken |
| Occupied | Units taken out of the total — for pools these are the individual rooms, not the room types |
| Free | Units still available |
| Seated guests | Guests against total capacity |
Every table on the plan is drawn to its shape (round, square, rectangular or bar) and its capacity — the dots around it are the seats. The colour is the state:
- 🟢 Free – no reservation on the selected day
- 🟠 Partly taken – only for resources that are a pool (see below)
- 🔴 Occupied – fully booked for the selected day; inside it says guests / capacity
When a resource is a pool
A resource is not always one particular table. Give it a Quantity / concurrent capacity greater than 1 under Operations → Tables and it becomes a pool — eight identical double rooms, ten identical treatment rooms, a communal table seating twelve.
For those, the map counts how much of it is taken, not whether anyone has touched it:
- inside the shape it says taken / total (
3/8= three of eight rooms), - 🟠 amber means some of it is still free,
- 🔴 red only once the whole pool is spent.
The Occupied and Free totals at the top count the same way — rooms, not room types.
A hotel with six room types and thirty rooms sees 6 / 30, not 1 / 6.
Floors and zones
Next to the filters is a zone switcher. All locations draws the whole venue at once; pick a single zone and the plan shows only that one — which is what a hotel means by a floor. The main building, the top floor and the annex each get their own drawing instead of three levels stacked on one.
You only ever lay out what is on the canvas: Auto-arrange with one floor selected does not touch the rooms on the others.
The Free only and Occupied only filters, by contrast, do not remove tables from the plan — they dim them. A room with holes in it is harder to read than a room with some quiet tables in it.
Laying out the room
To make the plan match reality, you place the tables yourself.
- Click Edit layout.
- Drag the tables to where they stand. They snap to a helper grid; hold Shift while dragging to place one freely.
- Save layout. Until you do, an Unsaved changes badge sits next to the heading, and Discard changes takes you back to the last saved state.
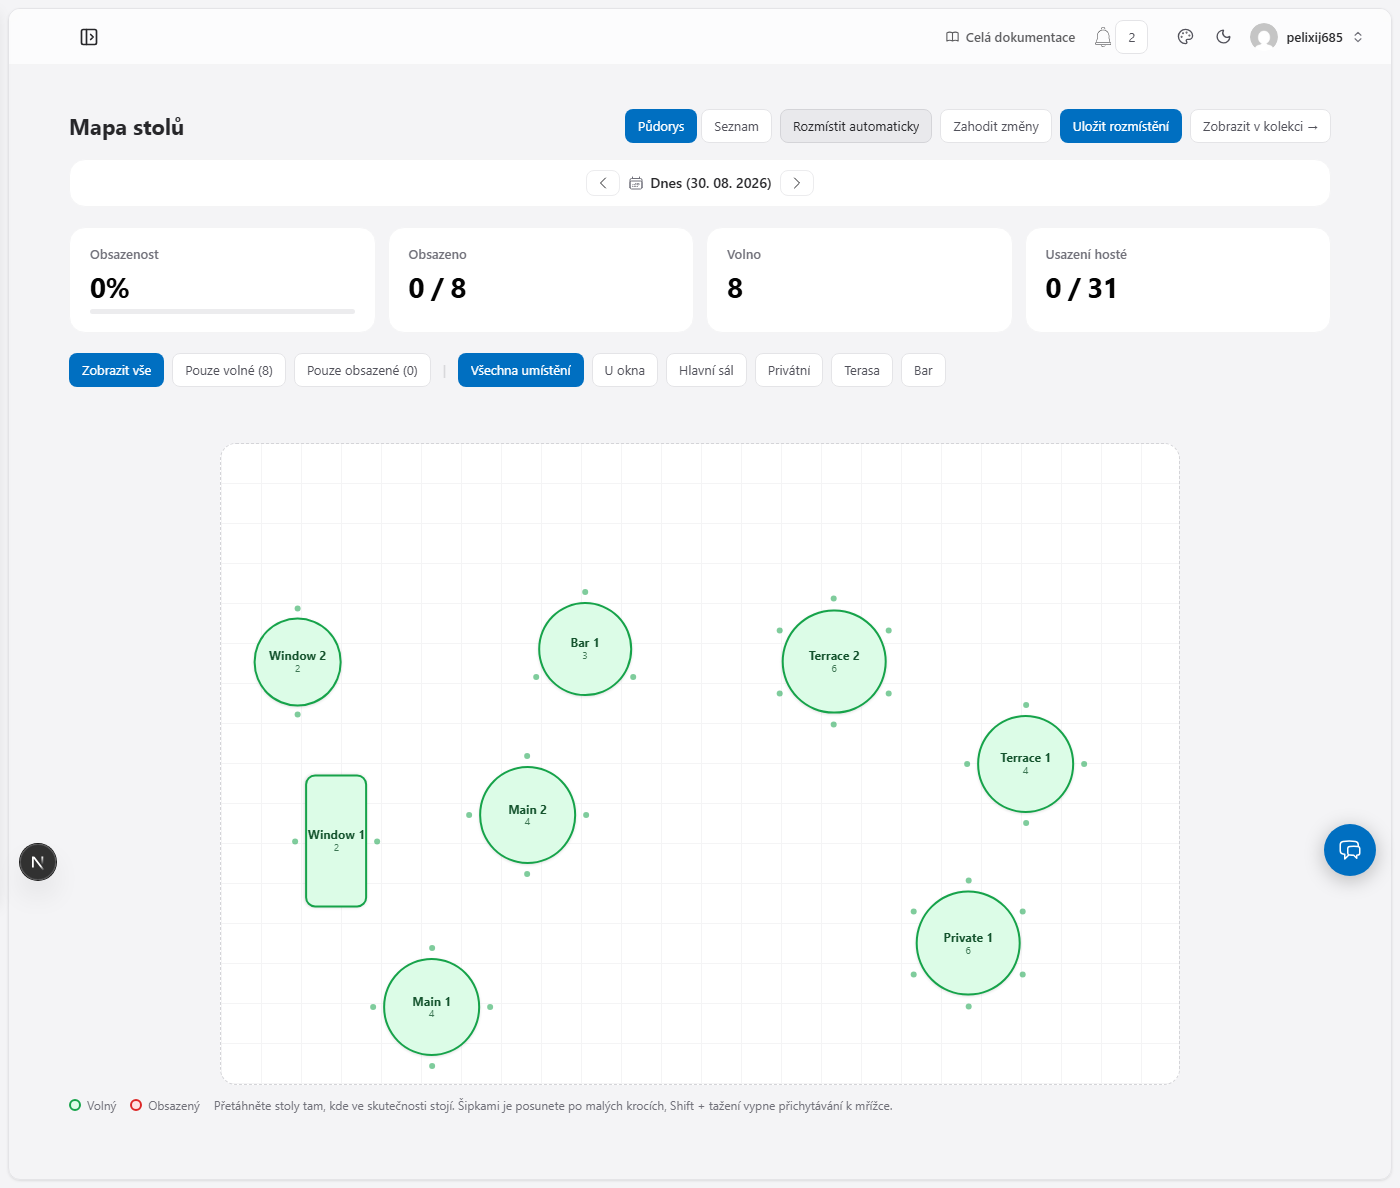
While you are editing, the automatic refresh pauses, so an incoming booking cannot redraw the plan under your hands.
The rest of edit mode
- Arrow keys nudge the selected table (hold Shift to move a whole grid step).
- Change shape cycles round → square → rectangular → bar/bench.
- Rotate turns a rectangle or a bar by 45°. The table's name stays upright.
- Auto-arrange lays out the tables that are not placed yet in a grid, grouped by zone. Tables you positioned by hand are left alone.
- Not placed yet, below the plan, is the tray of tables without coordinates. Drag them from there onto the plan.
The coordinates are stored on each table (Operations → Tables → Floor plan position), so they can also be typed in by hand as a percentage of the plan's width and height.
Edit layout is shown only to someone who may manage resources (typically the owner and an administrator). Everyone else reads the plan and works with it, but does not move the furniture. See Roles and permissions.
Working with the map
- Left/right arrows – move to the previous or next day.
- Today – jump back to today.
- Refresh – reload the current state manually.
- Click an occupied table – opens the reservation detail, where you can edit it directly.
- Click a free table – opens the phone-reservation form straight away.
While you're viewing today, the map refreshes itself, so a new booking won't slip past you. It also updates immediately whenever anyone creates or changes a reservation — including a colleague on another computer or the AI assistant.
Phone reservations straight from the map
When a guest calls, you don't have to go anywhere else:
- Find a free table for the requested day and time.
- Click it (or, in the list view, Quick reservation).
- Fill in the name, party size, time and duration, plus phone or email if you have them.
- Save — the reservation is assigned to that table right away.
For a large party that needs two tables pushed together, pick them under Merge tables in the form.
FAQ
The plan is empty even though I have tables. The tables have no coordinates yet. Click Edit layout → Auto-arrange, then fine-tune by dragging.
The map says I have no tables configured. Add tables first under Operations → Tables. See Managing tables.
Why is a table occupied when nobody is sitting there? The map counts reservations, not arrivals. If the guest didn't show up, switch the reservation to No-show and the table frees up.
Does the map show blockouts? Yes, blockouts occupy a table just like a normal reservation.
Do guests see the floor plan on the website? No. The layout is an internal tool for your staff; a guest picks a zone when booking, not a specific spot on the plan.